How to Update Your WordPress Theme
Whether you’re new to WordPress or have had your site running for years, keeping your chosen theme updated is key. Read on to find out the whats, the whys, and the hows—what a WordPress theme actually is, why you need to keep it updated, and then you can follow our steps to learn how to do it.
This tutorial is provided with the help of one of the WordPress largest themes marketplace ThemeForest.
Firstly, What Is a WordPress Theme?
Put simply, it changes the design of your website. It’s what users see when they visit and can include the layout, colors, and general look and feel of your site.
Why Do You Need to Update Your WordPress Theme?
- Speed
Staggeringly, a one-second loading delay reduces page views and customer satisfaction.. Updating your WordPress theme can boost site speed while ensuring you don’t get left behind!
- Security
If security issues or bugs are discovered, updates will be designed to resolve them. Keeping your WordPress theme up to date will help to keep your site secure.
- Features
It also means you’ll have the latest features at your disposal, as well as ensuring your theme is compatible with the latest plugins, etc. Stand out from your competition and give your visitors a reason to return!
WordPress Theme Update Checklist
Now you know the what and the whys, you’re through to the next level. But, before we move on to the hows, make sure you’re prepared by ticking off the points in the checklist below.
- Track Updates
It’s not currently WordPress’ policy to send an email alert each time a theme update has been released. To ensure nothing gets missed, head to your dashboard and check regularly for any update alerts.
- Check the Change Log
This is where developers share info about all the changes that have been made during a recent update. It’s especially important to review this document as it means you’ll know what to expect.
- Create a WordPress Backup
Before starting with the update of your theme, consider that backing up your website is vital in case an error occurs along the way. When hosted on SiteGround the easiest way to create a backup is through the backup creation tool.
- Consider testing on a staging copy!
Although creating a backup before the update can save you if the live update breaks something, it is even better to test the new theme version on a staging copy, before updating your live site. SiteGround customers on GrowBig and GoGeek accounts can use the free WordPress staging tool that is part of their hosting accounts.
- Be patient
It can be tempting to begin the process as soon as an update is released, but unless it is a security update we recommend that you try to wait around a week until you install it. If any mistakes have been made by developers, you’ll give a bit of time for them to be spotted and amended.
Completed it? Congrats, you’re ready to move to the next stage.
How to Update Your WordPress Theme
If you have everything ready, now it’s time to read through the hows. We will cover below how to update a theme taken from the WordPress repository and how to do it if it is provided by ThemeForest.
1. How to update a WordPress Repository Theme
WordPress Complexity Scale: Beginner
This option is super simple to master, and means you can update your theme without even needing to leave WordPress. To update your theme this way, pick one of the two options:
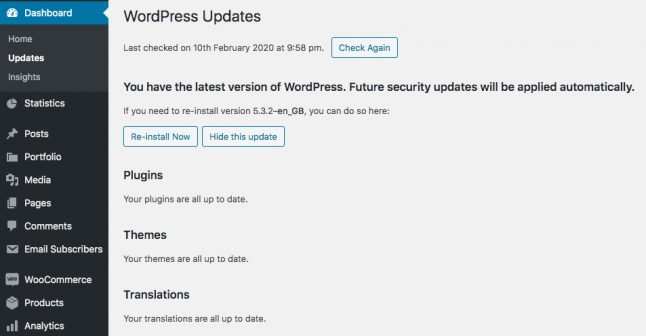
Head for Dashboard > Updates. Look out for your theme—if it’s included in the list, you can update the theme from here.
- Or, look for Appearance > Themes. If there’s an update for your theme, you’ll spot a notice about it directly underneath.
2. How to Update a ThemeForest WordPress theme
WordPress Complexity Scale: Intermediate
You may have opted to select your WordPress theme from ThemeForest rather than the repository—after all, it’s the world’s largest marketplace for WordPress themes so it’s the place to go if you’re after choice. The process for keeping your theme updated via ThemeForest is slightly different—read on to follow the steps to do so manually.
Log in to the developer’s site or marketplace
From there, you’ll be able to follow the steps and download a copy of the files.
Remove or rename the previous version
To do this, pick one of the following ways:
- Delete the relevant files from the wp-content/themes/ folder via FTP or file manager;
- Rename the files from the themes folder. By ensuring you still have a copy of the old files, if anything goes wrong along the way, you will still be able to access the older version of your theme;
- You can pick a relevant plugin to help you. You can take your pick from some of the options here;
Upload your updated theme file
To do this, we have two options for you:
- Inside WordPress, head to Appearance > Themes > Add New
- Or, you may already be logged into the control panel. From there, you can simply click upload.
Check everything has gone to plan!
At this stage, your theme update should have been uploaded. Log in and make sure you’re seeing everything you expect to see.
Delete your old theme file
If everything’s a-okay with step 4, then go ahead and delete the old version of the theme.